
- Contribute
- How to view your AWS NAT Gateway Data Transfer bill
- Cut NAT Gateway Costs — Use S3/Dynamo Gateway Endpoints
- 5 Minute Cost Savings Hack — Enable S3 Gateway Endpoint
- Step 1: Access The Gateway Endpoint Creation Console
- Step 2: Naming and Choosing a Service Category
- Step 3: Selecting S3 Service
- Step 4: Choose the VPC
- Step 5: Select the Route Table
- Step 6: Choose the Access Policy
- Step 7: Tag and Create the Gateway Endpoint
- Confirm the Creation of the Gateway Endpoint
- Resources
Last week, we looked at how to save money with AWS’s S3 service by implementing a quick hack to leverage Intelligent Tiering.
This week, we’ll take a look at reducing Data Transfer costs from our AWS monthly bill and how we can leverage some super easy configurations to reduce NAT Gateway expenditures within our VPCs.
Contribute
Have an idea for easily reducing monthly AWS fees? Please leave a comment at the bottom of the page!
How to view your AWS NAT Gateway Data Transfer bill
I wrote a guide in the last article that you can follow to view your monthly AWS bill.
In the billing console, you’ll find the two line items of interest that we’ll be focusing on cutting from our bill close to entirety:
- Elastic Compute Cloud > {Region} > Amazon Elastic Compute Cloud NatGateway

Cut NAT Gateway Costs — Use S3/Dynamo Gateway Endpoints
So, now let’s take a look at exterminating our AWS NAT Gateway expenditure from our AWS bill.
We can do this by reducing the amounts of data that we transfer across the NAT Gateway by taking advantage of Gateway Endpoints.
Before seeing how to do this exactly, I propose that we first understand what the NAT Gateway is and why we use it. to better understand how we can avoid using it.
What is a NAT Gateway?
A NAT (Network Address Translation) Gateway is a service that enables instances in a private subnet to connect to the internet or other AWS services, while blocking inbound traffic from the internet.

A NAT Gateway works by translating the private IP addresses of instances to public IP addresses, allowing them to communicate with external networks while remaining hidden behind the NAT Gateway.
Why use a NAT Gateway?
A NAT Gateway can be useful in scenarios where you have instances in a private subnet that need to access the internet, but you don’t want to expose them directly to the internet.

It can also be used to limit outbound traffic from your VPC, by only allowing traffic that originates from your private instances and is destined for approved destinations.
Overall, NAT Gateways improve security by allowing access to external services all while reducing access to your services in your private subnets from unknown external entities.
What is an AWS S3 Gateway Endpoint?
An AWS S3 Gateway Endpoint is an AWS managed endpoint that allows you to connect to S3 buckets from within your Amazon Virtual Private Cloud (VPC) without needing to use a NAT Gateway.
Typically, the expensive approach to accessing S3 from a private subnet in a VPC may have the following infrastructure:

From the diagram above, in order for the EC2 instances in the private subnet to access data in S3, the request and response containing the S3 data must traverse the NAT Gateway and the Internet Gateway — this is very expensive.
Now, let’s take a look at the exact same request for data from our EC2 instances in private subnets, except this time we will use a S3 Gateway Endpoint:

As you can see, AWS will prioritize using the Gateway Endpoint and will avoid sending traffic through your NAT Gateway and Internet Gateway — which saves a lot of money!.
Additionally, when you create an S3 Gateway Endpoint, it enables secure communication with S3, without requiring internet access. This makes data access more secure and fast!
5 Minute Cost Savings Hack — Enable S3 Gateway Endpoint
Let’s now take a look at how we can implement the S3 Gateway Endpoint into our own project.
Step 1: Access The Gateway Endpoint Creation Console
To begin, access the AWS VPC Console in your region of interest.
From the left-hand menu, click Virtual private cloud > Endpoints, or navigate to the Endpoints console by clicking here.
Then click the orange Create endpoint button.

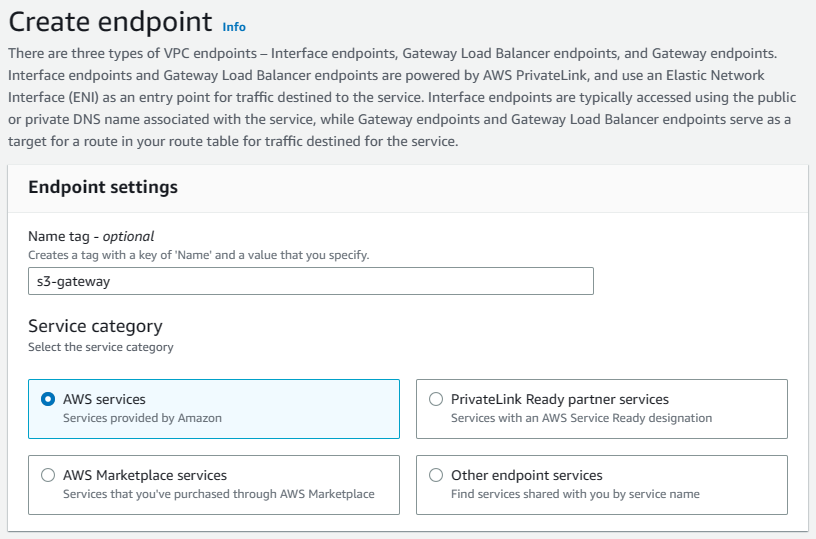
Step 2: Naming and Choosing a Service Category
In the Create endpoint console, we’ll start by naming our Gateway Endpoint Resource. This is arbitrary. I’ve gone ahead and used s3-gateway.
For “Service Category”, we’ll choose AWS services.
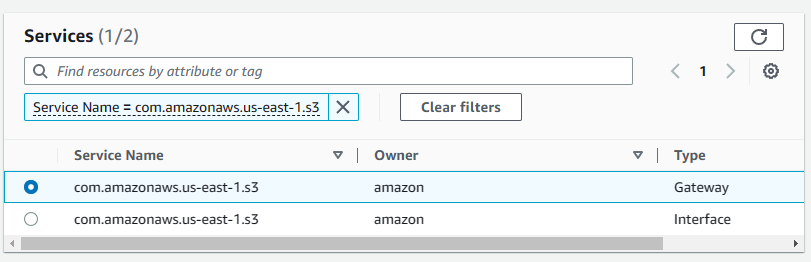
Step 3: Selecting S3 Service
You should select the Service Name to follow the pattern com.amazonaws.{REGION}.s3.
In this example, because I am using the region us-east-1, I’ll use the following Service Name: com.amazonaws.us-east-1.s3.
The “Type” should be Gateway.
DynamoDB Gateway Endpoint
For DynamoDB access, you’ll use a Service Name of com.amazonaws.region.dynamodb.
Step 4: Choose the VPC
This step is straightforward. All that you need to do is select the VPC of interest in which you would like to add the Gateway Endpoint.

Step 5: Select the Route Table
Go ahead and choose the Route Table that includes your private routes (associated with your private subnet). Read on if you’re unsure how to do determine this.

How to Determine if Route Table is Associated to a Private Subnet
A Route Table associated to a private subnet will have a NAT Gateway address. The “Target” has a prefix of nat-.
A route table associated to a public subnet will include the Internet Gateway (typically shortened to igw in a Route table).
Step 6: Choose the Access Policy
I personally choose Full access here, but if your application needs a Custom policy, now is the time to configure that.

Step 7: Tag and Create the Gateway Endpoint
If you would like to add tags to your new Gateway endpoint, now is the time to add them!
After adding Tags, go ahead and click Create endpoint.

Now, all data will magically transfer through the Gateway Endpoint, which is free!
Confirm the Creation of the Gateway Endpoint
You can confirm the S3 Gateway Endpoint has been created by accessing the Route Table’s console that you selected in the Create endpoint console.
You should see a Destination with a prefix of pl-.
